Manicure is much more than just aesthetic nail care. This is an essential step in maintaining the good health of your hands and cuticles. In this article, the wholesale nail supply distributors will tell you the essential steps to accomplish it effectively at home. Preparing the necessary tools For a simple manicure, it is essential to have all the necessary tools ready on hand before you begin. Here is a list of essential items: A bowl of warm water A clean towel A nail clipper A manicure kit (including nail file, wooden stick and nail buffer) Moisturizing hand cream Electric nail drill (optional) …
As we all know, semi-permanent nail polishes will revolutionize your manicure. Ultra-easy installation, long-lasting hold and a uniform finish. In this article, Maryton nail supply will show you how to achieve a quality manicure at home. STEP 1: BASIC Apply the base coat to all the fingers of the first hand, in a thin layer and without touching the cuticles. Border the end of each nail well (free edge). Catalyze for 30 seconds under LED lamp or 2 min under UV lamp. STEP 2: FIRST LAYER OF COLOR Apply a first thin layer of semi-permanent varnish to all fingers of the first hand. Correct if necessary, using …
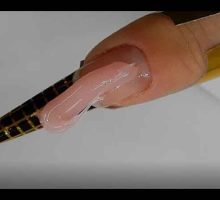
This method requires more time and skill but it gives you more flexibility to shape the nail into the shape you want. In this article, your nail supply specialist Maryton will tell you the steps for Applying Polygel with stencil. Here are the steps to follow: Prepare your nails. Start by pushing back your cuticles then filing your nails with a medium grit nail file. Clean your nails with alcohol then apply a dehydrator and a primer. Apply a gel base coat and let it harden for 60 seconds. You can now put on the stencil and sculpt the Polygel as …
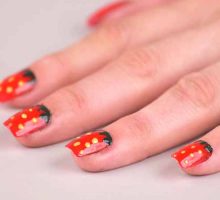
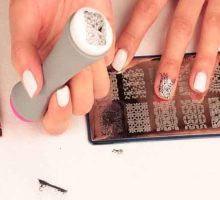
Nail prints are a cool nail art design! It’s very simple to operate and just takes a little more practice to get to perfection. In this blog, your nail supply expert Maryton made a step-by-step guide for you, which help you easily create your nail design with nail art stamping. 1. Preparing the workplace To avoid contamination on the table, you should place newspaper, kitchen paper or cosmetic wipes underneath. 2. Apply base coat After careful preparation, apply the base coat of your choice as full coverage on your nail. Let the product dry completely so that it becomes the perfect base for your …