No need to go to the manicurist to adorn your triangle nails, you can do it at home. It is very simple. In this article, the nail supply expert Maryton will tell you how to create your triangle nail art manicure. Keep reading!
All you need to do is arm yourself with a roll of tape, a pair of scissors and your favorite nail polish. The steps to follow:
- Give your nails the right shape and length then remove the cuticles.
- Cut two thin strips of tape.
- Apply a primer to the nails to protect them from varnish pigments.
- When the base coat is dry, apply a coat of varnish of the desired color.
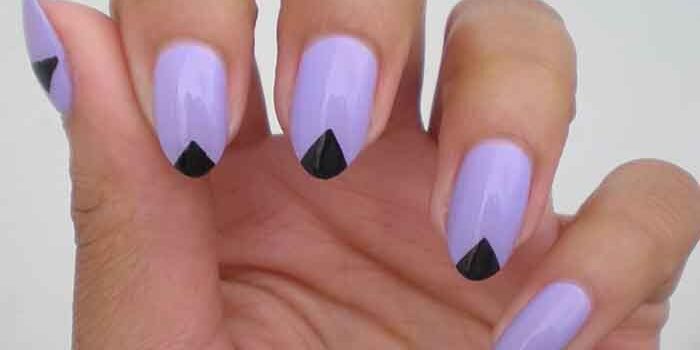
- Once the varnish layer has dried, limit the triangle area at the base of the nail with strips.
- Cover the area outside the triangle with a varnish of another color.
- The triangle will have the hue of the first color applied. Minimum drying time is 10 to 15 minutes.
- Wait for the second varnish to dry, then carefully remove the strips of tape.
- To finish, apply a top coat delicately, without applying too much pressure.
- Once the top coat has been applied, we clean the small traces of varnish that could have been left on the sides.
Hoping that this article has pleased you and will give you ideas! In addition, I also advise you to invest in some professional manicure sets to start your manicure journey.
Read also: 4 French manicures to adopt
 How to remove press on nails with glue? You should know that you are not going to remove your press on nails in the same way if you stick them with glue or gel pads, so be careful, because not all methods are suitable for glue. In this blog, the nail supply expert Maryton will tell you how to remove press…
 How do I apply my manicure products correctly for a uniform… Applying your manicure products correctly for a uniform and smooth result can be an exciting process, but it can also be confusing with suboptimal and poor results. What should you do? Don’t panic, the nail expert Maryton will give you several useful tips. Clean your nails: Before applying nail polish, make sure…
 Base coat: what is it and what is it for? We tend to confuse base coat and top coat, and yet, these two types of varnish are very different and each have their uses in your manicure. In this article, Maryton Nail Supply will tell what is base coat and what is it for. Read on! The base coat or varnish…